How to Color Grade Videos in InShot
When it comes to creating professional-looking videos, color is one of the most powerful storytelling tools. The colors you choose can set the tone, evoke emotions, and completely change the way your audience experiences your video. Fortunately, you don’t need expensive software like Adobe Premiere or DaVinci Resolve to achieve cinematic color effects — you can do it easily using InShot, a mobile-friendly and powerful video editing app.
In this article, we’ll explore how to use color grading tools in InShot to enhance the mood and atmosphere of your videos, along with practical examples and creative tips to make your videos visually stunning and emotionally engaging.
What Is Color Grading?
Before diving into the tools, let’s understand what color grading actually means.
Color grading is the process of adjusting the colors, brightness, contrast, and tones of a video to create a specific mood or visual style. It’s different from color correction, which simply fixes lighting or exposure problems.
For example:
- A warm golden tone gives a romantic or nostalgic feel.
- A cool blue tint can create a calm, mysterious, or cinematic look.
- A high-contrast color grade adds drama and intensity.
In short, color grading is like painting emotions onto your video.
Why Use Color Grading in Your Videos?
Color grading helps you:
🎬 1. Set the Mood: Whether it’s happiness, sadness, excitement, or suspense — colors influence how your viewers feel.
🎨 2. Build a Style: Consistent color grading across videos creates your own recognizable brand or visual identity.
🌆 3. Fix Imperfections: Sometimes, lighting during shooting isn’t perfect. Grading helps balance and enhance it.
💫 4. Make Videos Cinematic: Subtle tone and contrast adjustments make your footage look like a professional movie.
That’s why mastering color grading — even on mobile — is an essential skill for every video creator.
How to Use Color Grading Tools in InShot
Let’s go step-by-step through how to use InShot’s color grading features effectively.
Step 1: Open the InShot App and Import Your Video
- Open the InShot app on your phone.
- Tap on Video → New.
- Choose the video clip you want to edit and tap the checkmark to load it into the timeline.
You’ll now see all the editing tools at the bottom of the screen.

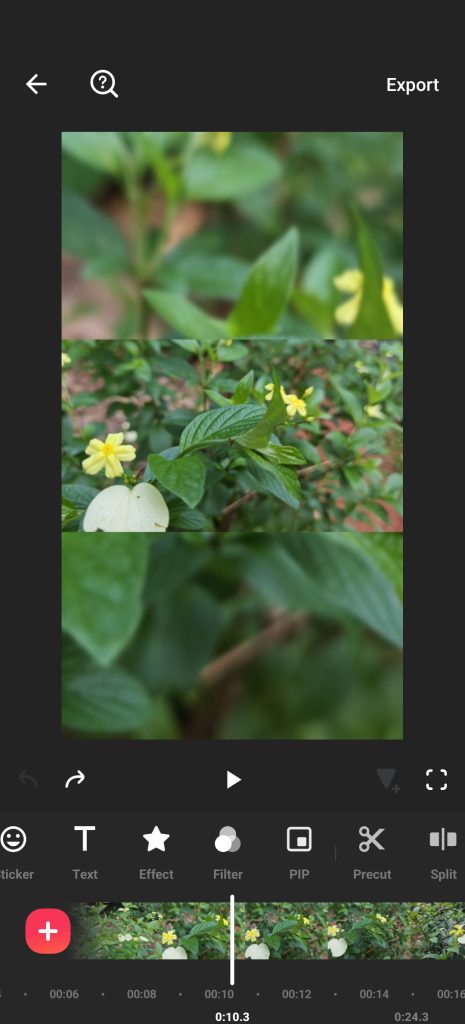
Step 2: Go to the Filter Section
InShot’s color grading tools are mainly found under the Filter section.
- Tap on Filter from the bottom toolbar.
- You’ll see three main tabs: Filter, Effect, and Adjust.
Each of these offers unique ways to change your video’s color tone and mood.
Step 3: Use Filters to Set the Base Mood
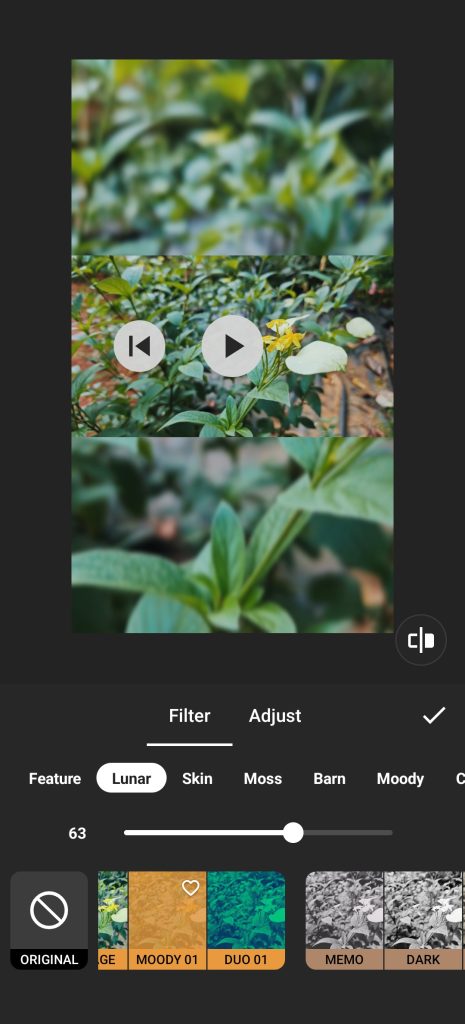
The Filter tab includes several preset styles designed for different moods and looks.
Here are some popular categories:
- Cinematic: Gives a dramatic, film-like feel with balanced tones.
- Warm / Cold: Adjusts the overall temperature of the video.
- Retro: Adds a nostalgic, vintage vibe.
- Bright: Ideal for happy, cheerful content.
- Dark / Moody: Perfect for mysterious or emotional videos.
Simply tap a filter to apply it, and use the slider to control the intensity.
👉 Tip: Avoid using filters at 100%. Keep it subtle — between 40% and 70% often gives a more natural look.
Step 4: Fine-Tune with the Adjust Tool
While filters are great for quick edits, real creative control comes from the Adjust tab.
Here’s how each adjustment can enhance your video mood:
1. Brightness
- Increases or decreases the overall light in your video.
- Use it to: Correct overexposed or dark clips.
2. Contrast
- Adjusts the difference between light and dark areas.
- Use it to: Make your video pop or look more dramatic.
3. Saturation
- Controls the intensity of colors.
- Use it to:
- Increase for vibrant, lively scenes.
- Decrease for calm or moody tones.
4. Tint
- Shifts color balance toward green or pink tones.
- Use it to: Match skin tones or create artistic color effects.
5. Warmth
- Adjusts color temperature — from blue (cool) to orange (warm).
- Use it to:
- Warm = cozy, romantic look.
- Cool = cinematic or night-time feel.
6. Shadows & Highlights
- Shadows: Brightens or darkens dark areas.
- Highlights: Adjusts bright areas.
- Use it to: Bring out hidden details or balance harsh lighting.
7. Fade
- Adds a soft matte effect.
- Use it to: Give your video a film-like, vintage tone.
8. Hue
- Changes the overall color tone.
- Use it to: Experiment with creative and surreal looks.
By combining these tools, you can create a perfect color balance that matches your story’s emotion.
Step 5: Add Effects for Style Enhancement
In the Effect tab, InShot also includes motion-based and color overlay effects such as:
- Glitch
- VHS
- Blur
- Color Boost
These can enhance your video’s style when used sparingly. For example, the “VHS” effect works great for retro or nostalgic edits.
Step 6: Apply Consistent Grading Across Clips
If your video has multiple clips, apply similar color adjustments to each one for consistency.
InShot makes this easy — once you find a perfect color tone, tap the “Copy” icon and apply it to other clips.
This ensures your entire video maintains a uniform mood and professional flow.
Examples of Color Grading for Different Moods
Here are some practical grading ideas you can try in InShot:
🎞️ 1. Romantic Mood
- Filter: Warm
- Adjustments: Slightly increase warmth and fade.
- Result: Soft, cozy, and emotional tone.
🌅 2. Cinematic Mood
- Filter: Cinematic or Retro
- Adjustments: Lower saturation, increase contrast, and add a bit of fade.
- Result: Professional, movie-like atmosphere.
🌧️ 3. Sad or Reflective Mood
- Filter: Cool or Dark
- Adjustments: Decrease warmth and brightness, add blue tint.
- Result: Emotional and calm tone.
☀️ 4. Happy and Cheerful Mood
- Filter: Bright or Vibrant
- Adjustments: Increase brightness, saturation, and warmth.
- Result: Fresh, lively, and colorful.
🌙 5. Night Scene
- Filter: Cold
- Adjustments: Lower brightness, increase contrast, and add slight blue hue.
- Result: Realistic, dramatic nighttime look.
These combinations are just starting points — don’t be afraid to experiment!
Tips for Perfect Color Grading in InShot
Here are a few practical tips to get the best results:
- 🎚️ Use Natural Lighting While Shooting
Good lighting during filming reduces the amount of editing needed later. - 👁️ Preview on Full Screen
Always check how the graded video looks in full screen — colors may appear different on small previews. - 💡 Avoid Over-Grading
Subtle edits often look more cinematic and professional than overly saturated or high-contrast ones. - 🧠 Match the Storyline
Choose colors that fit the emotion or message of your video — color should support your story, not distract from it. - 🎨 Create a Signature Style
Once you find a color style that fits your brand, use it consistently across all your videos.
Exporting Your Color-Graded Video
When you’re done editing:
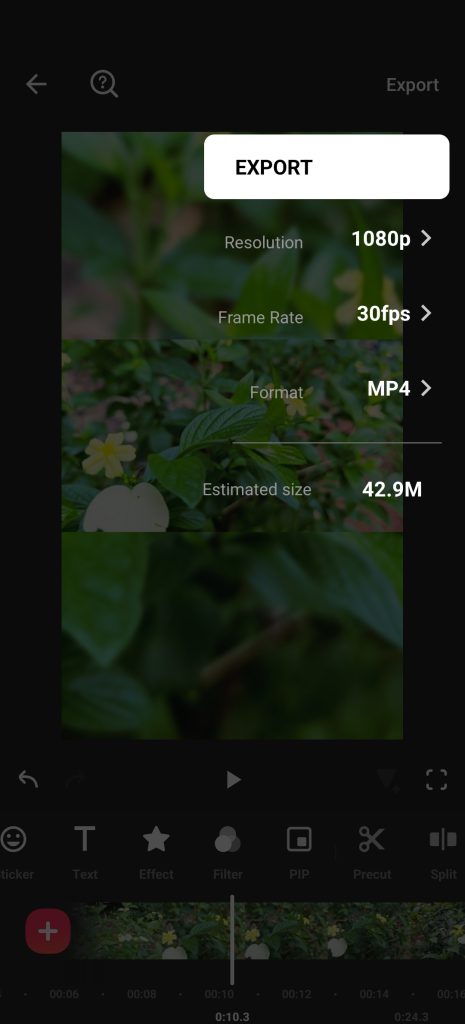
- Tap the Export button at the top-right corner.
- Choose your desired resolution (1080p or 4K for best results).
- Adjust bitrate if needed for higher quality.
Your video will now be ready to upload — beautifully colored and visually appealing.
Conclusion
Color grading is more than just a technical edit — it’s an art form that gives emotion, personality, and atmosphere to your videos. With InShot’s easy-to-use tools, you can now achieve stunning, cinematic color tones right from your phone.
By understanding filters, adjustments, and creative combinations, you can transform ordinary clips into professional, mood-rich visuals that truly connect with your audience.
So open InShot, play with colors, and let your creativity paint emotions into every frame. Remember — every great story deserves the right colors to make it shine.